|
Understanding Straight v Diagonal Graph prickings
It was in December 2006 that I first realised that I should have listened in Maths class rather than daydreamed. I was trying to get my head around the difference between straight and diagonal grids in Lace 2000. (later updated to Lace RXP and then Lace8)
Why? you may ask. I had printed out a pricking in 1/10 straight instead of 1/10 diagonal and was trying to understand why there was such a difference in the pricking size. I had the book Threads for Lace Edition 3 by Brenda Paternoster (her website is here and the latest version is Edition 6 in 2016) and I was trying to use it to work out what threads that I had, would work with what patterns I had or could make on Lace 2000.
Thus began my search for understanding. (see at the bottom of this page for addendum)
Arachne members offered advice as did my fellow Australian Gumnut but being mathematically challenged I was having trouble understanding the difference between diagonal and straight in regards lace.
A light bulb went nova while MSN chatting to Jenny Rees, (who had been the tutor at the Darwin Lace workshop I attended last year). Thank you Jenny!
The lace makers who have started designing without computers had to use what graph paper was available and to get a wider range of sizes they used the graph paper in the two ways described below. Lace2000 mearly follows their example. As I has skipped straight to Lace2000 without first using and understanding graph paper designing I lacked the understanding.
Below are the two diagrams I did that made sense to me. From these diagrams I realised that by printing out a selection of grids from the Graph Paper Printer program I could then measure and *know* what I had been trying so hard to fathom. (see Excel formulas where I confirmed my measurements)
The same size graph gives two different size prickings - dependent on the angle that the pricking is done at.
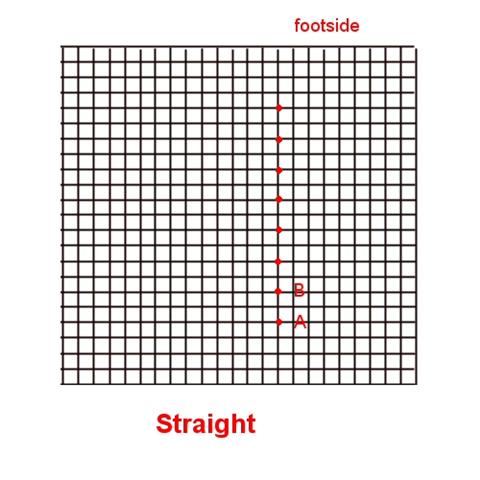
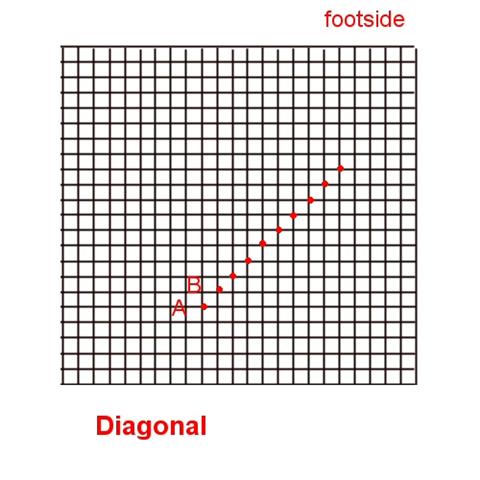
Note that on the Straight the dots are every 2 crossings and on the diagonal they are at every crossing - this is why there is a difference in the prickings!! The reason that one would use it straight and diagonal is one of logic, if you had a sheet of graph paper and wanted two or more sizes of prickings, use it two or more ways :)
Now that I finally got my head around that, it was a simple case of measuring to see the distances between dot A and dot B in the Torchon footside. I however chose to measure over a distance of 11 dots and divided by 10 to give me a more precise measurement. Below is what I came up with.
| |
Between A and B |
Graph size |
| |
1.4 mm |
1 mm diagonal |
| |
1.8 mm |
1/20 inch diagonal |
| |
2.0 mm |
1 mm straight |
| |
2.25 mm |
1/16 inch diagonal |
| |
2.8 mm |
2 mm diagonal |
| |
3.0 mm |
1/12 inch diagonal |
| |
3.5 mm |
1/10 inch straight |
| |
4.0 mm |
2 mm straight |
| |
4.2 mm |
3 mm diagonal |
| |
4.5 mm |
1/8 inch diagonal |
| |
5.0 mm |
1/10 inch straight |
| |
5.7 mm |
4 mm diagonal |
| |
6.0 mm |
3 mm straight |
| |
7.0 mm |
5 mm diagonal |
| |
8.0 mm |
4 mm straight |
| |
10 mm |
5 mm straight |
| |
|
|
| |
|
|
I also found out that 4mm = 0.15748 inches and 3mm = 0.11811 inches.
This can be cross referenced with the Threads wraps per space table on page 8 in Brenda Paternoster's book to find the right size thread for the grid, then a quick search in her book gives you alternative threads to use. NB: As I am working in Torchon it is the 12 column that this relates to to me.
For those who enjoy maths (and I am not one of them) the formulas I found that work in Excel to confirm all this are;
Fractions of inch to decimal of inch
A1 =
numerator (top number in fraction)
B1 = denominator
(bottom number in fraction)
|
=SUM(1/B1)*A1 |
Decimal of inch to millimetre
C1 = answer to fractions of inch to decimal of inch |
=C1*25.4 |
Millimetre to decimal of inch
A2 = millimetre |
=A2/25.4 |
Diagonal of a graph square
length*length + width*width = diagonal squared |
=SUM(A3*A3)+(B3*B3) |
Converting diagonal squared into a measurement
C3 = answer to diagonal of a graph square |
=SQRT(C3) |
I hope this makes sense to you as I doubt that I will EVER do this again.
Revisited the Grids page as I had realised that I might not be alone in trying to work out what thread would work with a particular pricking I had, especially when the pricking did not have a grid size or thread recommendation with it.
I measured along 11 footside pinholes, divided the answer by 10 to give the distance between 2 footside pins.
I wrote the Torchon Lace Assistance chart where I could look up what size graph it was and what thread size (wraps per centremetre) was recommended for it.
I then went to Brenda Paternoster's Threads for Lace, Edition 3 to find out what threads have that particular wpc. (edition 7 released in 2018)
Voila!
There is also a PDF file put together called WPC to Grid Chart that makes it easier for me to know what size grid will work with a particular WPC thread.
You can also use the Torchon Lace Assistance Chart based on known information such as :
- Existing pricking - find out what thread is recommended
- Existing thread - find out what pricking or graph paper is recommended
- Graph Paper - find out what size pricking and thread
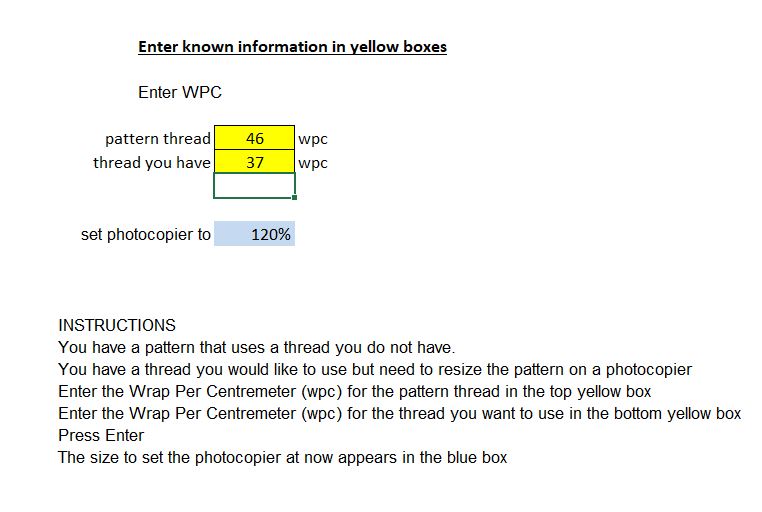
Personally, I use the Excel spreadsheet to calculate the size to photocopy the pattern to match the threads I have.
|